







I still remember the sharp morning my knees decided to stop cooperating, forcing me to hunt down the top rated mobility exercises for aging joints before I lost my sanity. That sudden stiffness is not just a sign of getting older, it is a loud plea from your body for intentional movement. You do not have to accept creaking, stiff knees as your permanent baseline.
Phase 1: Waking Up the Ankles and Feet
Feet rarely get the attention they deserve when we talk about joint wellness. If your foundation is stiff, every joint up the chain suffers. I start every morning with simple ankle circles and toe splay exercises before my feet even touch the floor. You want to sit on the edge of your bed, lift one leg, and draw slow, deliberate circles with your big toe.
Change directions after ten rotations, then switch sides. Doing this lubricates the ankle joint and wakes up the proprioceptors in your feet, which dramatically improves your balance. My personal secret is to actively try to separate each toe as far as possible at the top of every circle. It feels incredibly strange at first, but it releases years of shoe-induced tightness almost instantly.

Phase 2: Opening Up Tight Hip Sockets
Moving up to the hips, we usually find the culprit behind most lower back stiffness. Tight hips force your lower back to bend where it shouldn’t, leading to that familiar, deep ache. To combat this, I swear by the 90-90 hip stretch, which targets both internal and external rotation.
Also Read: Best Flexibility Routines for Stiff Office Workers 2026
Sit on the floor with your right leg bent at a 90-degree angle in front of you, and your left leg bent at 90 degrees behind you. Gently square your torso over your front shin, keeping your spine tall. Hold this for a minute while breathing deeply, then swap sides. This position might feel like a struggle if your joints are particularly stubborn. Keep a firm yoga block or folded blanket handy to place under your hip if you cannot sit upright without leaning heavily on your hand.
Phase 3: Restoring Spine and Neck Suppleness
A stiff back can make even the simplest tasks feel like climbing a mountain. We spend so much time hunching over screens that our thoracic spine eventually turns into a solid block of concrete. I use a gentle cat-cow flow to break up this stiffness and restore crucial spinal segment movement.
Get on your hands and knees, slowly arch your back toward the ceiling like a stretching cat, then reverse the motion to drop your belly and lift your chest. Keep your movements slow, matching each transition to your breath. Many people make the mistake of forcing their neck too far back during the extension phase. Instead, focus the movement entirely on your mid-back and let your neck follow naturally without any pinching.

Phase 4: Discovering the Top Rated Mobility Exercises for Aging Joints
Finding the right movements requires looking past flashy fitness trends and focusing on pure joint mechanics. Years of trial and error taught me that the top rated mobility exercises for aging joints are not about sweating or burning calories. They focus purely on expanding your active range of motion and improving synovial fluid flow.
Synovial fluid acts as the natural oil for your skeleton, and it only moves when you put your limbs through their full, natural pathways. When I first started, I made the mistake of pushing into sharp pain, thinking I was doing myself a favor. Now, I stay within a comfortable, pain-free zone of movement, which actually signals the nervous system to relax and allow deeper stretches. Stick to gentle, controlled rotations rather than explosive movements to keep your cartilage happy and intact over the long haul.
Phase 5: Shoulder Decompression and Rotator Cuff Care
Reaching for a high shelf shouldn’t require a prayer and a grimace. Our shoulder joints are incredibly mobile but highly unstable, making them susceptible to wear and tear. I use a simple routine called shoulder flossing with a light resistance band or a wooden broomstick to keep them moving smoothly.
Hold the band in front of your thighs with a wide grip, then slowly lift it overhead and down toward your lower back without bending your elbows. If your chest is tight, you will feel a massive stretch, so keep your grip as wide as necessary to complete the arc comfortably. I highly recommend performing this standing near a mirror to ensure your shoulders are moving symmetrically. Shrugging your shoulders up to bypass a tight spot is a common error, so keep your collarbones broad and depressed throughout.
Phase 6: Knee Protection and Quadricep Release
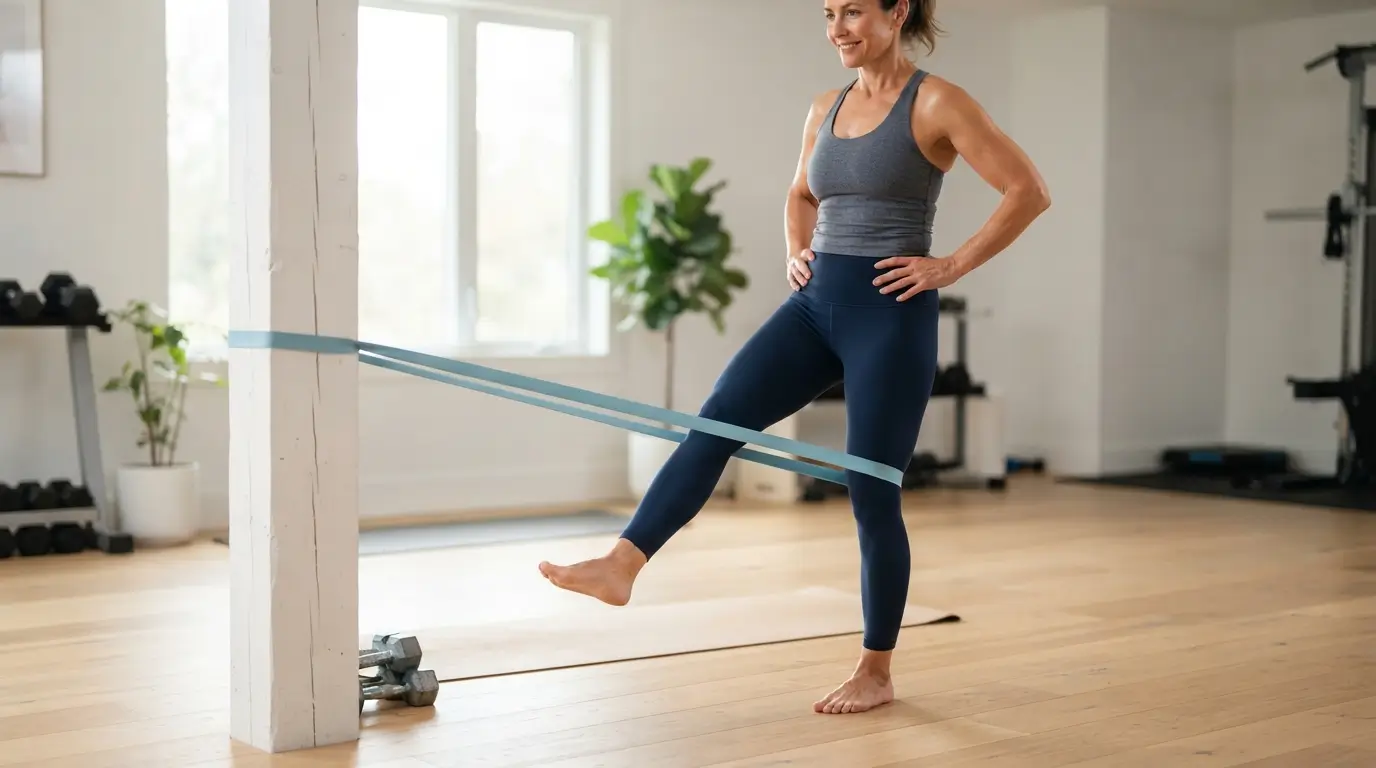
Knees often take the brunt of our daily impact, especially when the surrounding muscles tighten up. To keep my knees happy, I focus heavily on the muscles directly above and below the joint. The terminal knee extension, using a light resistance band looped behind the knee, works wonders for stabilizing the patella.
Anchor the band to a sturdy post, step inside so it pulls your knee forward, and then slowly push your heel down to straighten your leg against the tension. This simple movement activates the vastus medialis, which is the teardrop-shaped muscle responsible for tracking your kneecap properly. I make sure to perform this movement with high control, holding the straight-leg contraction for three seconds on each repetition. You should feel a gentle contraction without any pinching in the joint itself.
Phase 7: Building Consistency and Your Daily Routine
Creating a habit around movement is far more important than any single exercise session. I used to think I needed an hour of intense stretching to see any progress, but that approach only left me sore and discouraged. When I finally researched the top rated mobility exercises for aging joints, I realized consistency mattered more than duration.
Now, I commit to just ten minutes of focused work every single morning right after my first cup of coffee. This daily practice keeps the joints oiled and prevents the stiffness from compounding over the week. You can easily integrate these movements into your daily life, like doing ankle circles while watching the news or holding a hip stretch during commercial breaks. My biggest advice is to treat this routine as a non-negotiable form of hygiene, much like brushing your teeth. Your body will quickly reward you with easier mornings and significantly less daily discomfort.
Phase 8: Wrist and Grip Strength Revitalization
Hand stiffness can quietly slip into our daily lives, making simple tasks like opening jars a painful chore. I neglected my wrists for years until I noticed a distinct weakness when carrying groceries. To fix this, I perform gentle wrist extension and flexion waves daily to restore range of motion.
Extend your arm straight in front of you, use your opposite hand to gently pull your fingers down toward the floor, and hold for twenty seconds. Follow this by pulling your fingers upward to stretch the underside of your forearm. This stretch keeps the tendons that run through your carpal tunnel gliding smoothly without inflammation. I recommend doing this right at your desk, especially if you spend hours typing or holding a smartphone.
Phase 9: The Importance of Safe Proprioception and Balance
Balance naturally declines as we age, but we can actively fight this trend by training our joint awareness. Our joints contain tiny receptors that tell our brain where our limbs are in space. To keep these receptors sharp, I practice single-leg stands during my evening routine, often while brushing my teeth.
Stand on one foot, lift the other slightly off the floor, and try to maintain your balance for thirty seconds without moving. If you feel unstable, keep one hand hovering near a wall or a sturdy kitchen counter for safety. This exercise forces the tiny stabilizing muscles in your ankles and knees to fire rapidly, which prevents falls and builds joint confidence. It is a simple addition that delivers massive long-term safety benefits for active seniors.

Phase 10: Listening to Your Body and Knowing When to Rest
Rest is just as active as movement when it comes to keeping your joints healthy. Pushing through joint pain is a quick way to cause chronic inflammation and set your progress back by months. I learned the hard way that a dull, muscular ache is fine, but a sharp, stabbing joint sensation means you must stop immediately.
Give yourself permission to take a day off or scale back the intensity when your body feels exceptionally drained. True joint longevity comes from playing the long game, not from forcing movements when your tissue is irritated. If a particular movement feels wrong on a given day, swap it for a gentle walk or a warm bath instead.
Frequently Asked Questions
How often should I perform these top rated joint mobility exercises?
You should aim to do these exercises daily for the best results. Ten minutes of consistent morning movement keeps your joints lubricated throughout the day. If you are short on time, even a quick five-minute session can help prevent stiffness from setting in.
Can mobility work help with osteoarthritis pain?
Yes, regular movement helps manage arthritis by stimulating synovial fluid production. This natural fluid cushions your bones and reduces friction during movement. Always stay within a comfortable, pain-free range of motion and avoid forcing any joints that feel actively inflamed.
Should I stretch cold muscles first thing in the morning?
You should never stretch cold muscles aggressively. Instead, start with gentle joint rotations like ankle circles to build warmth. Gentle movement increases blood flow safely, preparing your soft tissues for deeper stretches without the risk of pulling a muscle.
How long does it take to see improvements in flexibility?
Most people notice a significant reduction in morning stiffness within two weeks of daily practice. True, long-term changes in joint range of motion generally take about six to eight weeks of consistent effort. Patience is your best ally during this recovery process.
Is it normal to hear popping sounds during these exercises?
Occasional painless popping or clicking is completely normal and usually harmless. This sound is often just gas bubbles releasing within the joint fluid. However, if the popping comes with sharp pain or swelling, you should stop immediately and consult a physician.
Conclusion
Reclaiming your freedom of movement is a journey of small, consistent steps rather than overnight miracles. Treat your body with patience, show up for your daily practice, and the results will follow. Have you noticed which of your joints tends to feel the stiffest when you wake up?




One comment on “Top Rated Mobility Exercises for Aging Joints 2026”